You may not have noticed, but we are now officially running on artsvp.com instead of .co! All of your previous links (bookings, invites, accounts etc..) will still work on the old domain but will be redirected to our new .com.
If you have any questions get in touch with our team in the chat box bottom right 😊
Bookings View Upgrades & Fixes
Improved
The bookings view on Events and Collections has now been upgraded to use a date range picker 📅 ➡️ 📅
You can now select multiple dates to view at once and be presented with a live check-in count of the dates you have selected.
Fixed
Downloads have now been updated to default to the same date range you have selected in the bookings view. No more blank downloads!
Guest Tickets
New
Guest tickets are now turned on by default when you make a new event! This means a unique ticket is generated for guest booked in. The booker can easily assign and share their guest tickets, and all tickets are scannable for quick on the door check in.
You can turn off this functionality by visiting the edit screen of any event an unchecking the "Enable Guest Tickets" check box.
N.B. Any event using QR codes will have this feature turned on but any events that didn't will not be affected.
Here is a video showing how easy it is for a booker to share their guest ticket either by email or sharing the link to the unique ticket.
Duplicate Events - Fast!
New
A long awaited feature is now available to everyone! Save time creating multiple events with a single one-click 'Duplicate' icon.
Click the icon shown in the image above in your dashboard view. You will be asked to confirm that you want to duplicate the event.
Once confirmed, we will duplicate the following:
Event details
Availability Settings
Associated Tickets and Extras
Any custom form fields
Your new event will automatically include a '(copy)' at the end of the internal reference and bookings will be turned OFF by default as seen below.
Please note, any Bookings or Invites on your original event will NOT by copied across.
Enhanced Date Selection
Improved
Selecting the date you wish to view in the 'Bookings' view for both Events and Collections has previously been quite confusing. The only dates available to select were those with associated bookings. This often left users thinking that the disabled dates were unavailable to book or blocked out.
We have now revised this date selector with three main changes:
All dates are now clickable (even if no bookings exist)
Small green dots are displayed below any dates with bookings
The dates of your event in which you are accepting bookings are circled
We hope this provides further clarity and improves your experience when navigating bookings. If you have any feedback or would like the calendar view to display more information, please get in touch!
Archive Bookings
New
In an attempt to clean up the bookings view from test, accidental or incorrect bookings, we have introduced the 'Archive Bookings' feature.
You can now remove bookings from this view by adding them to your Archive. In order to do this, the booking must be Cancelled first. Simply select the Cancelled booking you wish to Archive and click the 'Archive' button which sit's at the top right of the pop up.
If you accidentally archive a booking, you can always immediately 'unarchive' the booking by clicking the button again.Please see below for a short example:
Managing bookings - UI and functionality update
New
Improved
Handling booking changes just got a whole lot easier with the latest update to the booking modal UI. You can now easily find the information you want in a glance, and make quick edits to the booking.
This improvement should make handling customer requests to change the email on a booking, add an extra guest and resend the booking confirmation email a breeze.
Editing a booking
You can now simply click on a booking to open the booking modal and then click the edit icon next to either the name email or time/date of a booking to make updates.
What's more you can then click the resend confirmation email button to make sure the customer knows their booking has been updated.
Similarly you can edit the date and time of the booking and adjust the size of the booking by adding additional guests.
Bookings Upload - Guest Lists in a snap
New
Say goodbye to paper guest lists and hard to manage excel sheets!
With this new feature, you can upload your guest lists for events in bulk and utilize ARTSVP's sleek real-time check in functionality to make the on-the-door experience for your customers and staff a breeze.
How do I begin?
To get started, simply go to the event you'd like to upload your guest list for and navigate over to the bookings tab. Once there, click the green Booking button.
In the new booking form, you should now see a link below the 'Confirm' button labeled 'Advanced CSV Upload', by clicking that link you'll be taken to the CSV Upload Form.
Here you'll simply drag & drop or upload the CSV file with your guest/booking information. It is important to note, you'll need to conform to a specific format when you provide your guest list information. To make sure you're following the correct format a link to download a CSV template with example records are provided on the page as well as a useful help article found below:
Once you upload your CSV and press 'Confirm' the booking generation process will start and you'll be notified via a success notification when all of your bookings have been created. If something went wrong a red error notification will pop up letting you know what went wrong.
If you have any questions, please contact us using the 'Live Chat' button and we can help get you on your way!
QR Codes - Check in made easy ✅
New
An exciting and long awaited feature is finally available!
Don't have time to take names on the door? You can now ask your guests to show their QR code at the door and start checking them in fast and efficiently.
How do I turn this on for my guests?
Simply head on over to the 'Edit' page for you event and select 'Enable QR Codes' under optional settings and click save.
Once this feature is enabled, your guests will see a 'View QR Code' button on their booking confirmation screen.
Clicking that button will simply show the code like so
How do I scan a QR code?
Scanning a code is easy. You will now see a QR code symbol on your bookings view (for both events and collections). Instead of searching for the name or scrolling through your list, simply tap the QR code icon show below.
This will bring up the scanner (you may need to accept browser permissions first!) and allow you to scan your guest QR codes all within your bookings view. No need to download an extra app!
A successful scan will automatically show the name, number of guests, booking time and the event they have booked to visit.
You can simply tap 'Check In' and then 'Scan a new code' to move on to your next guest.
Suitable error messages will be shown if any guests attempt to check in with incorrect QR codes.
Please note: Only bookings made within the Collection or Event you are using the scanner from will be accepted.
If you have any questions, please contact us using the 'Live Chat' button and we can help you get set up.
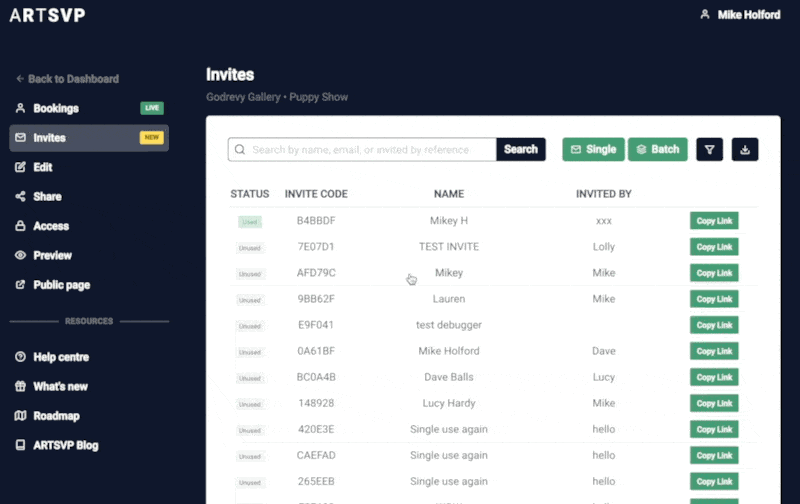
INVITES 💌
New
One of the most highly requested features is now live!
Take control of your events and offer unique experiences for your guests all with the help of invites!
Invites act as personalised booking links. You can pre-populate your guest invite with their name, email and any private internal data you may wish to remember. Once your guests receive the link there will be no need for them to enter their details, making the booking process even faster than before.
If you choose to personalise invites, guest's do not have the power to change the details you entered, making these links secure, only to be used by those intended!
You also have the option to batch create a set of up to 1,000 unique invites, each with their own unique invite code. Merge them into your own personal event email or simply use them to retain greater control over your attendees.